reated May 1, 2008
 |
<== Alle Maya-Befehle in diesem Buch - Alle! In Deutsch! |
reated May 1, 2008
|
<== Alle Maya-Befehle in diesem Buch - Alle! In Deutsch! |
Basic things you should know (and maybe never dared asking).
Grundsätzliches, was Sie wissen sollten (aber vielleicht nie zu fragen wagten)
|
Does ZBrush do Maya any good? |
 |
Tut ZBrush Maya gut? |
|
|
|
|
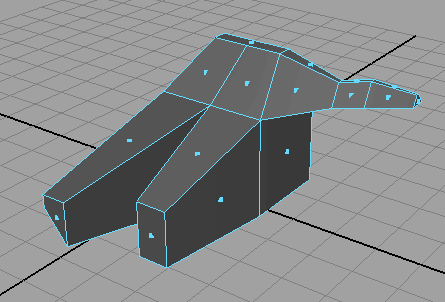
It sure does! Autodesk might probably argue that Mudbox does Maya even more good, but I'm not sure about this ;-] ZBrush is a highly interactive sculpting and texturing tool which lets you do things you can do within Maya, but with much more effort and less intuitively. Let me show you how to ZBrush a simple model created in Maya and then re-import it into Maya. Nothing about texturing here, only modeling. No serious modeling, fun modeling. Let's start with something really simple. Pick a polygon primitive such as the Poly Cube and do a few, just a few modifications. The object in the following illustration is my starting point: |
Klar tut's das! Autodesk wird vielleicht einwenden, dass Mudbox Maya noch mehr gut tut, aber das ist nicht erwiesen ;-] ZBrush ist ein Werkzeug, mit dem sich 3D-Objekte höchst intuitiv modellieren lassen. Die Arbeit ähnelt der eines Steinmetzes oder eines Bildhauers, insbesondere wenn Sie ein Grafiktablett benutzen. Maya hat auch "Sculpting"-Werkzeuge eingebaut, aber sie reichen nicht an die Eleganz von ZBrush heran. Wenn Sie wollen, zeige ich Ihnen hier ein einfaches Modell, was ich aus Maya nach ZBrush exportiere, dort verändere und wieder zurück in die Hände von Maya spiele. Ich hätte dabei etwas Ernstes modellieren können, etwa eine Hand oder ein Schwert, aber ich belasse es bei einem abstrakten Objekt und meinem Spaß damit. Die erste Abbildung zeigt ein 3D-Objekt in Maya, was ich aus einem Polygon-Würfel (Cube) durch ein paar Extrusionen gewonnen habe. Etwas sehr Einfaches, gar nichts Besonderes: |
|
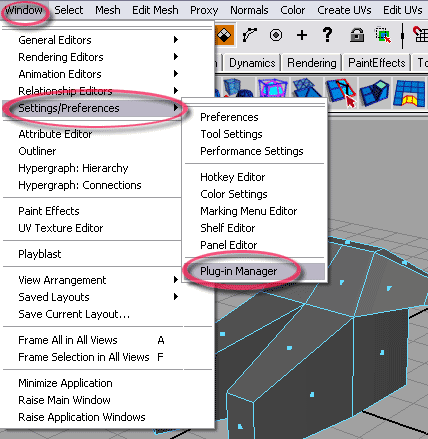
My nonsense object consists only of a handful of polygon faces. In the next step we'll export it so that ZBrush can read it. ZBrush can read .obj-files, also known as Wavefront obj files. Maya in its default state does not offer the obj-export option although it is included in the standard Maya package. You need to activate the option via the Plug-in Manager: |
Mein Nonsense-Objekt besteht nur aus einer Handvoll Polygonflächen. Im nächsten Schritt exportiere ich es, damit ZBrush es lesen kann. Denn ZBrush kann keine Maya-Dateien lesen, wohl aber .obj-Dateien, auch Wavefront obj Dateien genannt. In seinem Auslieferungszustand bietet Maya Ihnen die Exportoption ".obj" nicht an. Aber keine Sorge, sie gehört zu dem Programm; Sie müssen sie nur einschalten. Rufen Sie dazu in Maya den Plut-in Mananger auf: |
|
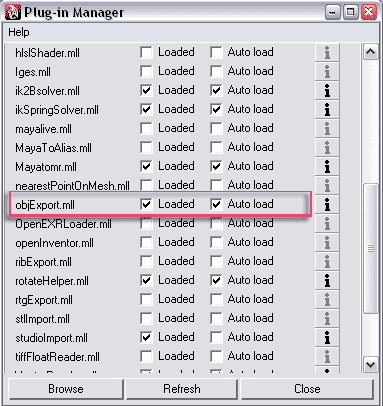
The Plug-in Manager shows you lots of plug-ins. A very important one for example is Mayatomr.mll which handles the exchange of data between Maya and the Mental Ray renderer. You find the obj-export plug-in right below. It's called objExport.mll. If you need it only in this session, activate the option next to "Loaded". If you want the plug-in to load at startup, check "Auto load": |
Der Plug-in Manager zeigt Ihnen viele Plug-ins. Die angehakten sind bereits aktiv, etwa Mayatomr.mll. Es dient dem Datenaustausch zwischen Maya und dem Renderer Mental Ray. Etwas darunter finden Sie das, was wir brauchen: objExport.mll. Wenn Sie nur heute obj-Objekte exportieren wollen, haken Sie das linke Kästchen an ("Loaded"). Wenn Maya zukünftig das Plug-in bei jedem Start laden soll, aktivieren Sie "Auto Load": |
|
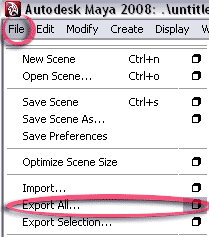
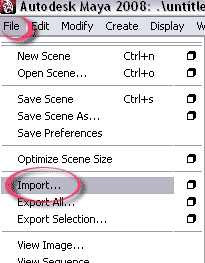
After this is done you can export the selected object ("Export Selection...") or the whole scene ("Export All..."). You find the Export commands under the File menu. Open the the option box of the Export All command: |
Wenn das erledigt ist, können Sie das ausgewählte Objekt ("Export Selection...") oder die ganze Szene exportieren ("Export All..."). Nutzen Sie in jedem Fall die Options-Box (das kleine Quadrat): |
|
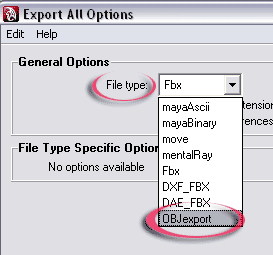
The option box lets you choose among several file types. Fbx for example is the format Motion Builder will read. For our example choose OBJexport from the General Options menu: |
In der Optionsbox des Exportbefehls können Sie unter verschiedenen Dateiformaten wählen. Fbx z.B. ist das Format zum Export in Motion Builder. Wählen Sie für unser Beispiel OBJexportaus: |
|
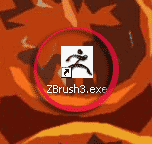
Remember the location where you saved the obj-file. Now launch ZBrush. You can load a completely functional demo version via Pixologic's website. |
Merken Sie sich den Ort auf Ihrer Festplatte, wo Sie die exportierte Datei speichern. Nun ist es Zeit, ZBrush zu starten. Sie können ein voll funktionsfähige Demoversion der Software von der Webseite des Herstellers, Pixologic, herunterladen. |
|
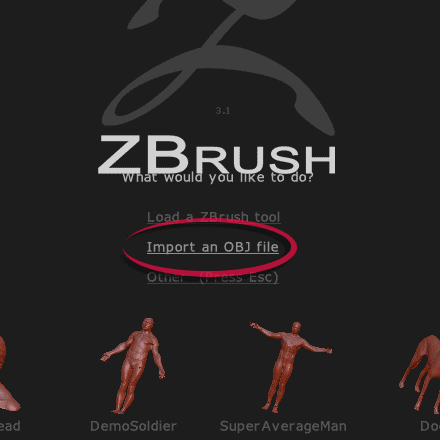
ZBrush presents you with the question what to do. "Import an OBJ file" comes really handy here: |
ZBrush bietet Ihnen gleich nach dem Start die Möglichkeit, ein OBJ file zu importieren. Tun Sie das! |
|
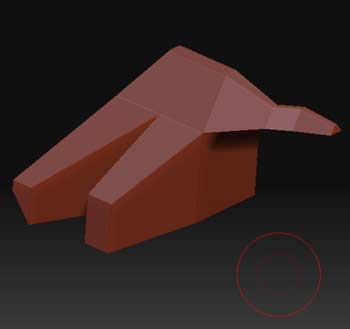
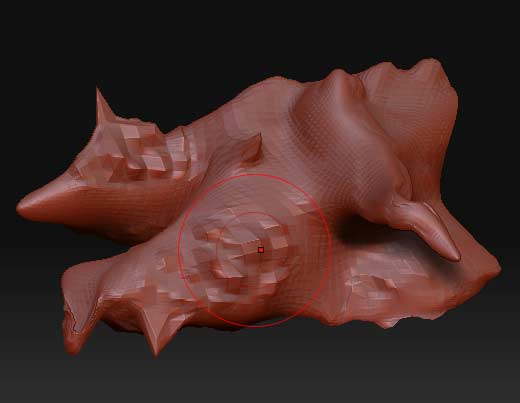
Select the file you just exported from Maya and load it into ZBrush. Like all default ZBrush objects it looks red. And it's ready for sculpting as you can tell from the red circle on the buttom right in the next illustration. This is the brush you'll use for sculpting: |
Nachdem Sie ZBrush die Datei auf der Festplatte gezeigt haben, erscheint sie im Standard-Rot auf Dunkelgrau. Das Objekt ist bereit, geknetet zu werden. Sie sehen unten rechts auf der nächsten Abbildung den Kreis, der den Pinsel darstellt. |
ZBrush offers loads of ways to modify a 3D object. In this example I mainly used the Standard and Move brushes for sculpting. Also important is subdividing your model (CTRL-d). In the illustration below you see the original object subdivided once but otherwise untouched: |
ZBrush bietet viele Werkzeuge, Objekte zu verformen. Ich habe hier vor allem die "Pinsel"Standard und Move benutzt. Damit Sie detaillierter arbeiten können, drücken Sie ein- oder mehrmals STRG-d, um die Auflösung des Modells zu erhöhen. In der nächsten Abbildung sehen Sie das einmal unterteilte, aber noch nicht weiter manipulierte Objekt |

Now I just sculpted away, I let the tools carry me away. I pressed CTRL-d several more times to get more resolution. And as you might have guessed: The real fun starts when you use a graphics tablet. |
Ja und jetzt geht's los mit dem Kneten. Ich habe mich nur von dem Grafiktablett-Pinsel leiten lassen und lauter Unsinn modelliert. Zwischendurch musste ich die Auflösung erhöhen: |
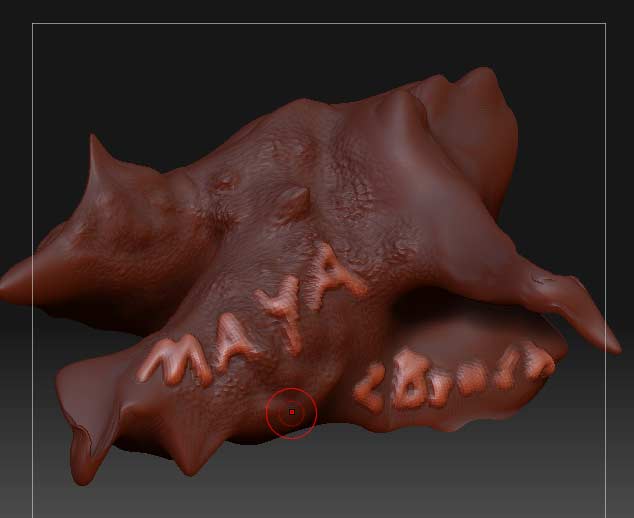
For the sake of this tutorial you can do anything you want with your 3D object. Here, I use ZBrush's masking function to mask out certain areas. The best way to learn about this an other techniques, do consult the ZBrush video tutorials site. |
Für diese Fingerübung können Sie alles mit Ihrem 3D-Objekt tun, was Sie wollen. Ich nutze in der nächsten Abbildung die Maskierungs-Funktion von ZBrush, um bestimmte Bereich auszublenden. Eine hervorragende Methode, diese und andere Techniken kennenzulernen, sind die Video-Tutorials auf der Webseite des Herstellers. |
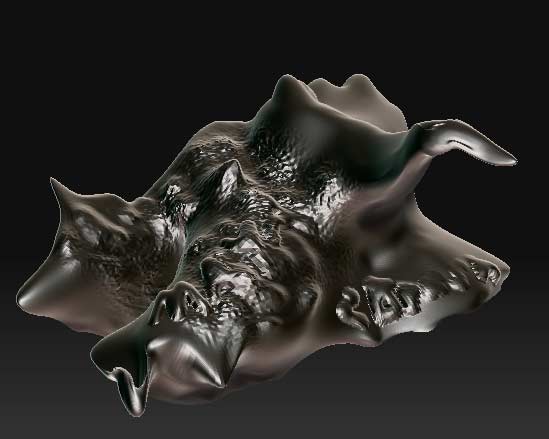
And just to show off, I choose a chrome texture for the object: |
Und um noch ein wenig anzugeben wende ich jetzt eine Chrom-Textur auf das Objekt an: |
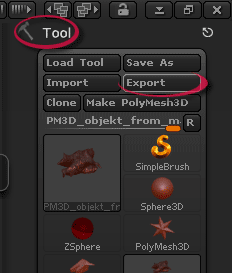
The chrome texture, by the way, won't find it's way back to Maya because we don't care about texturing here. In order to do texturing you need to assign a texture map to a polygon object within Maya. Then, in ZBrush you can paint on the object and export the result (the image and the bumpf map if you wish) as an image (or two) which you finally reimport into Maya. A neat thing to do is to apply the painted texture in high resolution onto an object with a much lower geometry resolution within Maya. This is ideal for computer games where you can deal with hi-res textures but not with hi-res geometry. All this aside: Let's export the sculpted object from ZBrush back to Maya. Under the Tools tab you find the Export button: |
Das Chrom wird den Weg zurück in Maya übrigens nicht schaffen. Das hängt damit zusammen, dass wir dem Objekt in Maya keine "Texture Map" verpasst haben [soll ich darüber eigentlich mal ein Mini-Tutorial hier machen?], also eine Karte aufgeklebt, die bestimmt, wie die Texturen zu verlaufen haben. Hätten wir das getan und anschließend innerhalb von ZBrush auf das Objekt gemalen, hätten wir die Ergebnisse unserer Textur-Malkunst als Bilddateien (oder -dateien, falls die Bump-Map auch noch dabei sein soll) getrennt exportieren und dann in Maya benutzen können. Eine interessante Variante dieses Prozesses ist es, in ZBrush eine hochauflösende Texture zu malen und dann in Maya auf das Objekt in einer geometrisch niedrigen Auflösung aufzutragen. Es sieht dann komplex aus, weil die Textur komplex ist, aber es ist geometrisch leicht, also ideal für Computerspiele. Aber das alles beiseite. Wir exportieren jetzt das Objekt zurück nach Maya. Unter Tools finden Sie den Export-Knopf: |
Save the object and remember the location of the file. Then re-import it into Maya: |
Sichern Sie das Objekt, merken Sie sich, wohin Sie's abgespeichert haben, und re-importieren Sie es dann in Maya: |
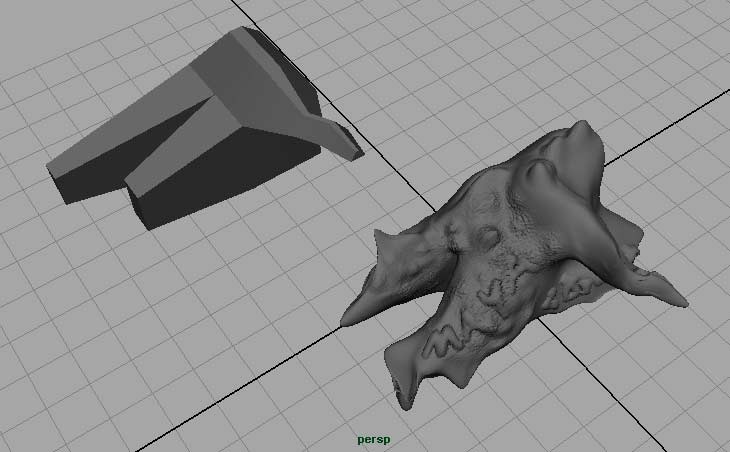
The ZBrushed model arrives in Maya's default grey. Quite a frustrating look at first. But it arrived in all its new complexity, after all. In the illustration below I placed the original polygon object next to the one coming from ZBrush (right): |
Das ZBrush-Objekt kommt im Mayas etwas frustierendem Grau an. Aber es ist angekommen, in seiner ganzen Komplexität. In der nächsten Abbildung habe ich das Originalpolygonobjekt links neben das neue platziert: |
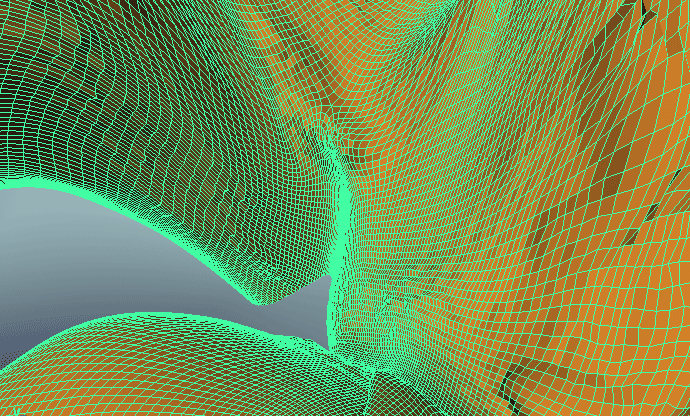
The resolution of the object is extremely high. Here a detail of a version textured within Maya: |
Die geometrische Dichte des Objekts ist erschreckend hoch. Unten sehen Sie einen Detailausschnitt, mit Textur: |
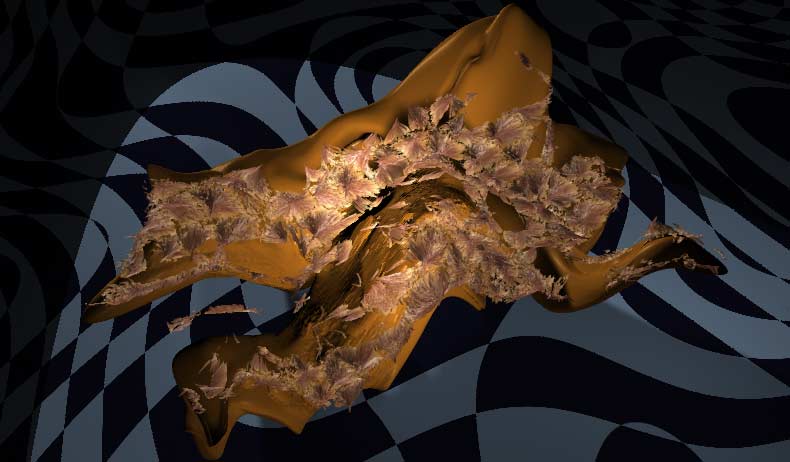
And for the fun of it, I planted a couple of fur segments on the object and rendered it in an environment with 3 lights. Due to the complexity of the model rendering time was around impressive 5 minutes on a standard 2 GHz computer: |
Und aus Spaß habe ich hier und da ein bisschen Fell aufgetragen und in einer Umgebung mit 3 Lichtern gerendert. Wegen der Komplexität der Geometrie lag die Render-Zeit bei beeindruckenden 5 Minuten auf meinem normalen 2 GHz-Rechner: |
|
Final Note. Every piece of software has its own limitations and strenghts. A mighty 3D package like Maya lacks of highly intuitive sculpting tools which are the speciality of programs like ZBrush. On the other hand you cannot animation things in ZBrush. Also, there are no modeling tools such as extrusion or local refinement available here. The key is to pick the right tools for your goal. In order to choose them make yourself familiar with the tools on the market. And make sure they're compatible with your main tool, Maya. ZBrush is. |
Abschlussbemerkung.
Jede Software hat ihre Grenzen und Stärken. Ein gewaltiges 3D-Programm wie Maya fehlt ein hochgradig interaktives Modellierungswerkzeug, für das ZBrush berühmt ist. ZBrush kann dafür nichts animieren, ja es finden sich nicht einmal Standard-Werkzeuge der Polygonmodellierung in ZBrush wie die Extrusion oder die lokale Verfeinerung. Der Schlüssel zum Erfolg besteht darin, das richtige Werkzeug für Ihre Zwecke zu finden. Um es zu finden, müssen Sie sich mit den Programmen beschäftigen, die es auf dem Markt gibt. Und Sie müssen sicherstellen, dass diese Programme auch mit Ihrem Hauptwerkzeug, nämlich Maya, kompatibel ist. ZBrush ist es. |